15 KiB
| title | date | url | tags | draft | |||
|---|---|---|---|---|---|---|---|
| FX chains by the utterly inept | 2025-07-24 | fx-chains-by-the-utterly-inept |
|
false |
Once upon a time ago (and a time, and a time), I had a podcast. I miss podcasting dearly and think about going back often — otherwise, what am I to do with a partial, flawed understanding of normalizing to a target loudness and editing around the disgusting noises my mouth makes? Well, share it with others, of course.1
In case it was not clear, I am not a professional. I am a blockhead who likes to tinker and who has watched a lot of YouTube videos. These are the FX chains I use for my voice, which may or may not be helpful to other people who do not have my voice. This is not an exhaustive audio guide or overview of how I edit my audio. Maybe another time.
Currently, I use a RØDE Procaster as my microphone and a MOTU M2 as my interface. I have a Fethead between the two because otherwise people complain I am too quiet on Discord. I bought a pop filter designed for the RØDE Podmic; it fits on my Procaster and works, but it looks a little ridiculous, so sometimes I take it off. I paid several hundred dollars this setup so that I can capture my two dollar voice with fidelity.
Back when I was podcasting with a co-host over long distances, I swore by Ennuicaster for recording because I admired the creator's pedantic approach to audio and hostility toward their end user.2 Ennuicaster is clunky and temperamental, but the pricing model is fair and the audio it spits out is top-notch. It is also the only recording application that I know of with a prominently featured weasel mascot. If I'm recording just myself, or something in person, I record straight into Reaper, which I also use to edit.
I have a project template set up to automatically open in Reaper with my FX chains. Theoretically, they are specific to my voice, but I imagine you can steal a lot of this for yourself. I'll do my best to explain what each step does and provide an audio sample for A/B comparison.3
Here is the raw audio I'll work with, with no editing aside from when I fucked up the second sentence of my favorite book.
{{}}
Individual Track Chain
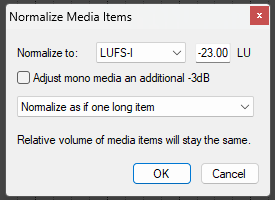
I start by normalizing the track to -23 LUFS. It's important to normalize as if it's one long item — I made cuts where I messed up, and if I normalized each item individually, there would be weird modulations in volume mid-sentence. Our final target volume will be -19 LUFS (for a mono podcast); I start with -23 to give me some headroom — I'll boost later in the chain.
{{}}
Now I start adding FX to my individual track (not the master). I have collected many paid VSTs over the years; you can almost certainly copy their exact effects into Reaper's free (and excellent) equivalents. I start with FabFilter's Pro-DS, which removes some of the harsh sibilance.4 I believe this is almost entirely the "Female Wide Band" preset. The settings are pretty conservative; I used to really hammer them down and produced many podcast episodes where I sounded as though I had a lisp.5
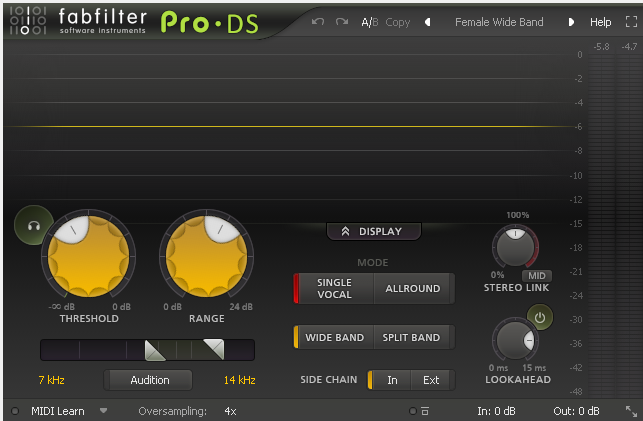
Mode: Single Vocal
Threshold: -36 dB
Range: 6 dB
Band Processing: Wide Band
Lookahead: 12.00 ms (enabled)
High-Pass Frequency: 6.834 kHz
Low-Pass Frequnecy: 14 kHz
I like Pro-DS because it has a nice display of what it is and isn't attenuating. You could easily achieve this with a free de-esser or an EQ curve.
{{}}
I incidentally picked a great passage to read — there are a lot of s sounds. Can you notice a difference? Probably not, but they are ever-so-slightly softer.
The next step is Mouth De-click from iZotope. If you spend money on any VST, I really recommend this one. It gets rid of the disgusting wet mouth sounds. If you ever want to vomit, check the box that says "Output clicks only" and listen through to your audio. I am almost certainly using a preset here, too.
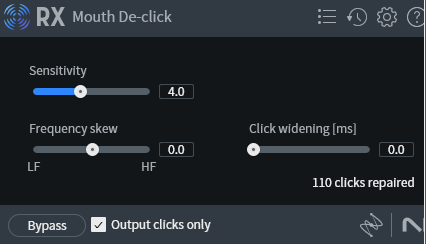
Sensitivity: 4.00
Frequency Skew: 0.00
{{}}
Next, I use ReaGate as to reduce noise and breaths, which I believe I copied almost entirely from this video. I tend to inhale sharply when I laugh, and I am in general not very good at breathing, so the gate cleans that up a little.
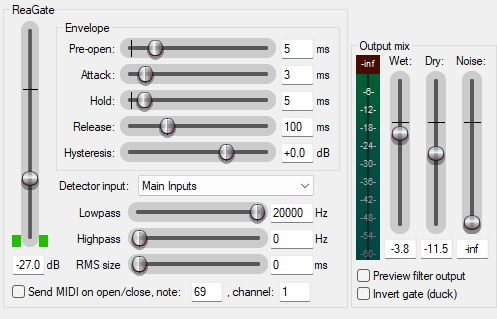
Threshold: -27 dB
Attack: 3 ms
Release: 100 ms
Pre-open: 5 ms
Hold: 5 ms
Lowpass: 20000 Hz
Hipass: 0 Hz
Dry: -11.5 dB
Wet: -3.8 dB
I believe the video goes into this, but there's a mix of "wet" (the processed audio) and "dry" (the raw audio) going on here to make the effect a little more smooth: I'm not removing all of the breath, just attenuating it. I like to think of it like lowering the opacity for a breathing layer in Photoshop. I have no recollection of how I arrived at these numbers, but I like them. In the example below, pay attention to the word "neighborhood" — the breath after it is way less noticeable.
{{}}
Sometimes the gate can make certain words or laughs sound funny, in which case I use a bypass envelope.
Now it's time for an EQ, which is perhaps the part of this chain most specific to my voice. I spent a lot of time playing with curves and settings (and, again, watching YouTube videos) until I found something I liked for my nasally voice. I am using FabFilter's Pro-Q 4, but again, you can just copy my curve into whatever EQ VST that you have.
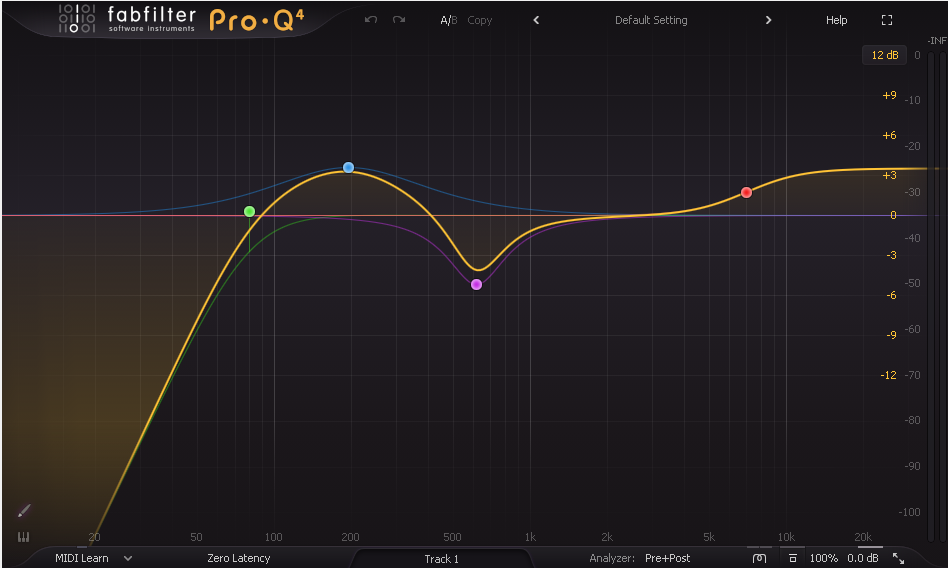
Band 1 Frequency: 80 Hz
Band 1 Gain: 0.00 dB
Band 1 Q: 1.036
Band 1 Shape: Low Cut

Band 2 Frequency: 194.49 Hz
Band 2 Gain: +3.59 dB
Band 2 Q: .765
Band 2 Shape: Bell

Band 3 Frequency: 617 Hz
Band 3 Gain: -5.14 dB
Band 3 Q: 2.096
Band 3 Shape: Bell

Band 4 Frequency: 6966 Hz
Band 4 Gain: +3.51 dB
Band 4 Q: 1.0
Band 4 Shape: High Shelf
I've found this curve preserves a faithful representation of my voice but makes it a little more warm.
{{}}
Now, I add a second EQ curve — this time to tamp down the remaining sibilance, which may have been amplified by my previous EQ curve. The next step is compression where I don't want to further accentuate my whistly s sounds. This curve is again specific to my voice — I swept for the frequency that I found harsh and attenuated it.
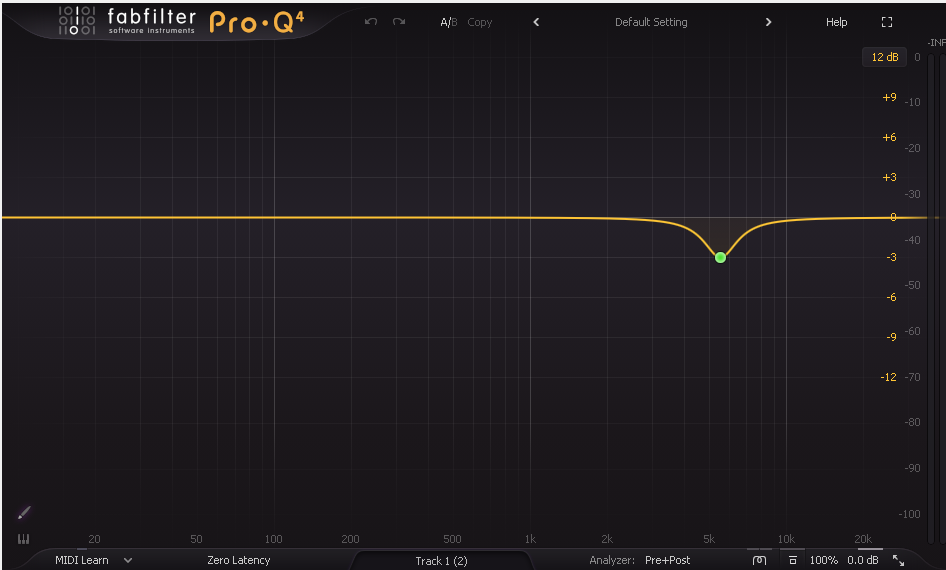
Band 1 Frequency: 5540 Hz
Band 1 Gain: -3.00 dB
Band 1 Q: 3.800
Band 1 Shape: Bell
There will still be whistle in here — I'm working with the voice that I have — but it's a little bit smoother.
{{}}
Now it's time to compress! A compressor helps to even out the difference between loud speech and quieter speech. The example audio that I'm using here is pretty even to begin with, but when I'm talking to another human, I tend to be less monotone. I'm again using a FabFilter VST — Pro-C 2 — but you can copy these settings into any compressor.
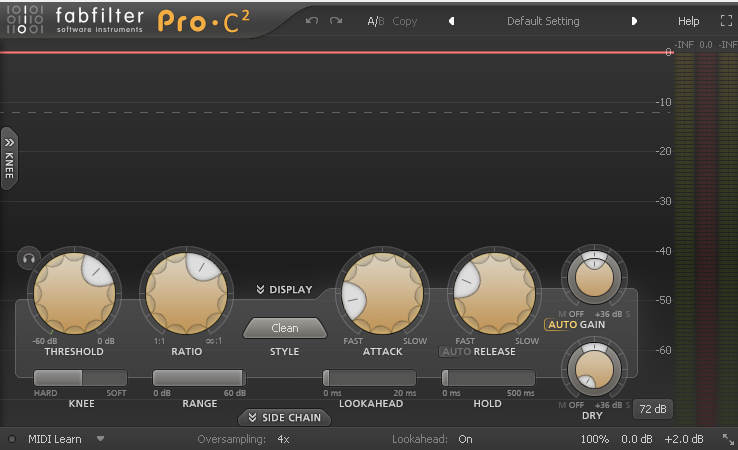
Threshold: -12 dB
Ratio: 4.00:1
Knee: +18.00 dB
Range: +60.00 dB
Attack: 1.000 ms
Release: 100.0 ms
Lookahead: 0.300 ms
Hold: 0.000 ms
Wet: 100%
Dry: 0%
Auto Gain: On
Output Level: +2.00 dB
This step boosts the overall loudness of the track, so the example audio should seem a bit boosted compared to the previous ones.
{{}}
This next step is entirely optional, but I use Slate's Fresh Air to add a little bit of presence to my voice and get a touch of that NPR sound. It is very easy to overdo this effect, so take a tempered hand with it. The plug-in is free if you give them your email address.
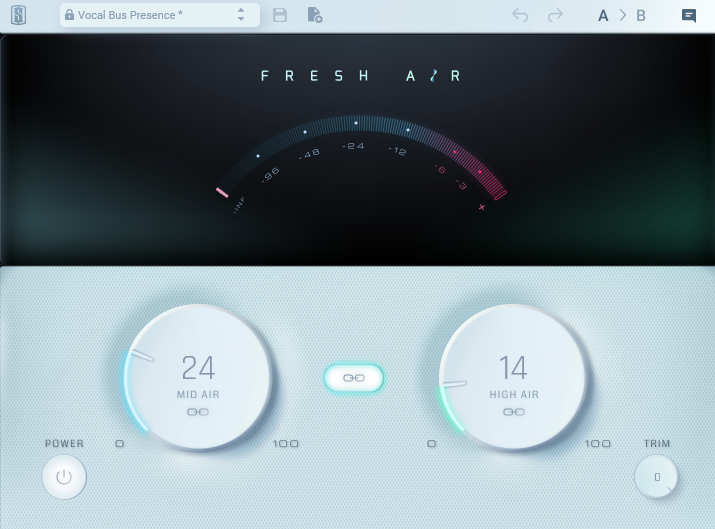
Mid-Air: 24%
High Air: 14%
{{}}
Finally, for my individual track, I apply a limiter (ReaLimit) just to knock down any remaining peaks. Again, this is a fairly monotone clip, and I'm conservative with my levels, so it doesn't kick in much at all here — it's more of a safety.
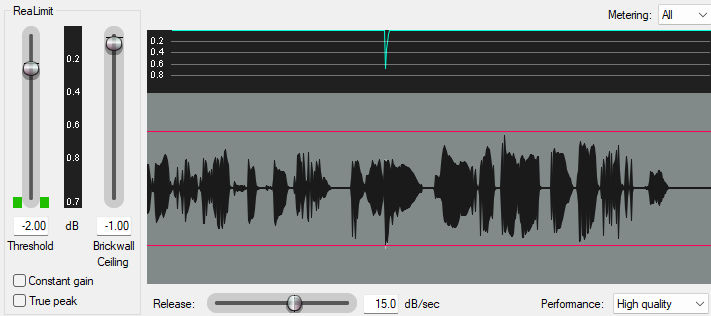
Threshold: -2.00 dB
Ceiling: -1.00 dB
Release: 15.0 dB/sec
{{}}
That's the end of the processing I do on my individual track. A co-host or guest's chain would be fairly similar, but I would tweak the EQ curve and de-essers to suit their voice and possibly add some more aggressive noise removal depending on their recording conditions.
To recap, here is the chain for my individual track:
- Normalize entire track to -23 LUFS (treat as one item)
- De-ess
- Mouth De-click
- ReaGate
- EQ
- EQ (to de-ess)
- Compressor
- Fresh Air
- ReaLimit
This latest example is peaking at -1.00 dB (thanks to the limiter), and the LUFS-I measure is -15.8. That's a little too loud for a podcast, but we'll take care of that on the master track.
Master Track Chain
The example audio I've been using only has one speaker, and if I was a solo podcaster, I could just put this chain at the end of the other chain. But if you have multiple hosts, or you use sound effects, you need to make sure that the audio is balanced — like if two people are talking at the same time (which you should generally avoid anyway). Additionally, we want to hit a target of or around -19 LUFS. I don't fully understand LUFS but I'm going to try to explain it nonetheless: LUFS is a measure of the average perceived loudness of audio. There may be spikes or some quieter portions, but on average we want our podcast to hit -19 LUFS (a broadcast standard for mono audio). If all podcasts do this — which they should — it will mean that you can listen to an episode of one show then switch to a different show without having to adjust your device's volume. Ideally, dynamically inserted ads would also hit -19.0 LUFS and therefore be at the same perceived loudness as the regular episode, too. This has not been my experience with even professional shows.
Now, LUFS isn't the only measure we care about, because we could reach an average but still have a wide dynamic range. We've already taken care of that, though, with our compression on the individual tracks.
I use only one effect on the master track. It is Waves PlaylistRider Mono, which takes care of the loudness targeting for me through some wizardry. TriLeveler 2 is a great free alternative that has way more buttons and sliders, but PlaylistRider works well for a knucklehead like me.
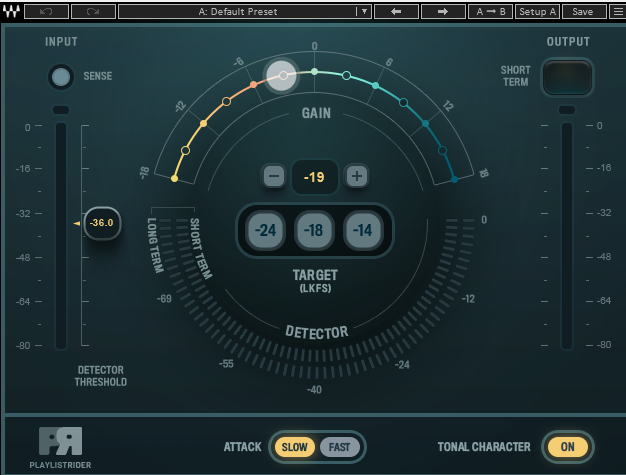
Tonal Character: On
Attack: Slow
Detector Threshold: -36 dB
Target LKFS: -19
(I also have a Loudness Meter on the master track, but that's just for measuring.)
{{}}
This last export measures at -18.8 LUFS with a peak of -1.0 dB and an LRA of 3.6. Nobody is going to cry about ± 0.2 LUFS, so I'm happy with what I have. However, if you want to be really sure, you can use the Normalize/fade option when you render your final export in Reaper; after Reaper finishes processing your final, it will apply a final boost to get to your target LUFS. In my experience, this works fine, but I'd rather do the loudness targeting on my own.
Please be aware that I have absolutely no fucking clue what I'm doing, ever.
I am sure there are audio snobs reading this and laughing at my incompetence. I hope I have made clear that I'm a dunce who has watched a lot of YouTube tutorials, so you can spare me the elitist bullshit: it's on you for expecting me to speak with any kind of authority. Of course, if you have genuine, well-meaning corrections, advice, or just ideas for me to play with, I'd love to hear that! I love to tinker; I take pride in audio that I produce (despite appearances) and enjoy learning more. At this point, I'm happy with the audio I spit out, even though it's far from perfect — but I hope what I've learned can help other jackasses like me.
To anyone podcasting, or thinking about podcasting, please just start. I have fallen into the gear acquisition syndrome trap too many times and told myself I need a $200 microphone and dozens of VSTs to get great sound. You don't, and you don't need great sound, either. There's a level of "good enough" audio that will please your listeners who are probably smashing episodes through their $12 dirty buds, anyway. Focus on having fun and making shit that makes you smile. That's all we have in the end.6
-
I believe the internet should be a platform for sharing information freely and openly. Unfortunately, I also believe I have two fundamental rights: (1) to be full of shit and (2) to have internet access. I hope that, as a critical thinker and consumer, you can discern that I have zero (0) fucking credibility ↩︎
-
Not really, but who else would design a UI like that? ↩︎
-
I'm exporting these audio files to 128kbps CBR mono MP3s, which is what my final export would look like for a podcast episode. I've turned off the normalization I do within the rendering step for the sake of the examples; I'll explain more about that at the end. ↩︎
-
I find that my voice has a lot of natural sibilance; my s's whistle. I have considered dental surgery to correct this (not really), but I fear a monkey's paw-esque repercussion and have instead decided to resign myself to my lot in life (being really fucking annoying) ↩︎
-
Please still podcast if you have a lisp. I do not have a lisp, and, again, my goal is to accurately capture my shitty voice, so I will not add a lisp in post. ↩︎
-
I didn't intend for this post to end on a nihilistic note, but quoth Mac Miller: "I don’t know why all my albums end in death. I guess because that’s what happens in life." ↩︎